Pages

Saturday, August 30, 2014

Target Dress Redo!

It all started with this dress.  I first saw it at Target a few years ago and absolutely loved it.  I knew I wanted to remake it into something else, but I didn't want to pay full price for it so I waited for it to go on sale.  Well, I ended up waiting too long, because the only one I could find was an XL - which is not quite my size as you can see below.

I could definitely pinch more than an inch!

Here's my process of transforming the dress.  Let the alterations begin!

First, cut off a few inches below the waist.

Here it is after it's cut.


Next, cut straight up the center back.


Install an invisible zipper - stopping at the waist.

 I was very happy with the invisible zipper.  This is before pressing - you can hardly tell where it is!

Next, pin the sides to fit and add a few tucks to the front too.


Thread trace the pin lines on the inside. This will serve as your stitching guide for the seam.


Sew the seam and serge the edges.


Try on.  I needed to sew the tucks a little higher so I pinned the in place and stitched.


Next, determine how long you would like the ruffle and cut from the bottom up on the leftover piece.  Cutting from the bottom up allows you to use the already stitched hemline from the original dress - one less thing to sew!  Cut a straight line down the center back too - just like you did for the top portion earlier.

Next, gather the ruffle piece.  I zig zag over embroidery floss to make my gathers.  With a wide zig zag stitch, simply place the embroidery floss between the zigs and the zags and sew, making sure not to catch the thread as you sew.


Here's another pic of the gathering process.  Be sure to knot the starting end of your floss before sewing.


Then, simply pull the floss and adjust the gathers.  This method works especially well when you have alot of fabric to gather and you don't want to worry about the threads breaking with two rows of straight stitching.


Next, pin the ruffle in place and try on.  Once you have it where you are happy, repin and sew right sides together.


This placement looked pretty good to me.  Sew the ruffle in place, finish the zipper and you are almost done!


Next, sew on some cute ribbon above the ruffle.

Very important next step - find some cute shoes!

And Ta Dah!  All done!

Here's the before and after.  Quite a change!
Until next time - Happy Sewing everyone!

Sunday, August 24, 2014

McCalls 6966

Here's my latest Stashbushin' Project and I just love it!  A new skirt pattern from McCalls 6966, pictured below.  

McCall's Misses' Skirts 6966

Here's the line drawing:
Line Drawing

I made view E - the one with the different fabrics for each section.  This skirt is meant for knit fabrics and I was able to use 4 different knits I already had without having to buy anything!

At first, I wasn't starting out to good.  I wasn't happy with the way everything looked because it just looked to plain.  Even though it was different fabrics, it was still missing something.


So I got out my boxes of ribbons and trims and starting playing and here's what I came up with.

Here's a description of everything.  All of this was already in my stash too so I was quite excited - especially to use the printed elastic.  I bought a bunch of this stuff in different prints and colors a year ago and it's been sitting around awaiting a use.  Finally, a project that would work with it!  I needed something stretchy for the top layer since this is nearest the waistband and needs to stretch in order to get the garment on and this worked out perfectly.

And here's the finished product!  Yippee!

Just by chance, I managed to get the Ric Rac to line up as well.

 And the other side too.

And here's the back.

And this has to be my new favorite elastic waistband technique.  Can you see the elastic in here?  I don't think so.  To make this waistband, you will need 4 pieces of fabric - two for the front and two for the back. Sew these pieces together front to back at the side seams (on one set - leave a small 1/2" opening on one of the side seams about 1/4 down from the top).  Then with right sides together, sew both pieces together 7/8 inch down from the top of the waist - all the way around.  Next, sew them again 1/4" away from the top of the waistband. This will form a casing.  Next, insert your elastic, sew up the small opening and then turn right side out and the elastic is enclosed between the two layers.  It's like magic!


I'm up to 19.375 yards of stash fabric sewn.  10.625 yards to go to hit my 30 yard goal!  I'm almost there!

Until next time - Happy Sewing!

Saturday, August 16, 2014

Modkid Madeline

Maddie


This is the Madeline skirt by modkid sewing patterns.  The pattern includes four different skirt styles, each with knit yoga waistbands.  I selected View B - which is the version featured on the front of the pattern that you see here.

The front and back pieces are cut on the bias so they drape fairly nicely and stretch along with the waistband to pull the skirt on.  The two front "mock wraps" are finished on three sides and then sewn into the side seams and are held in place by the two buttons in the front.

This was my first time sewing a modkid pattern and the instructions are very clear - lots of pictures and explanations along the way.  I made a size Medium with no alterations which was surprising because I usually like a little longer skirt, but this one was the perfect length for me.

The instructions for measuring and cutting the waistband might seem a bit daunting for the beginning sewer, but if you read everything carefully and do the calculations using your own measurements, it turns out ok.


And here's my version.  It was a bit windy this day and the flaps on the skirt wouldn't lay flat.  I'll take some pictures inside to show you the detail.

Here's the skirt on my dress form.  Although this skirt is very comfy to wear, I feel that the waistband is just too big and too thick - it's a double fold of fabric that is folded down again to create the yoga waistband - this gives you a total of 4 layers of fabric at the waistline.  If I make this skirt again, I'll change the waistband so the folded down portion is not so big and bulky - I'd probably change it to just two layers with nothing folded over.

The skirt front and back pieces are finished with double fold bias tape.  To me, the side view looks a bit odd because the bias tape doesn't carry onto the hem of the mock wrap pieces - it just ends at the side seam.

 Here's a close-up of the buttons I used - I did manage to find the perfect combination!

Just a quick post for today.  This skirt was made a few years ago and thought I would share with everyone.

Until next time - Happy Sewing!


Friday, August 15, 2014

New pillows!

Another Stashbushin' Project completed!  New pillows for our travel trailer.

This panel was purchased at a Quilt Show's garage sale a few years ago.  I just happened to have some cording trim in my stash that coordinated with the fabric and enough stuffing leftover from another project to complete them.  Here's the before pic:

And after - Ta Dah!  Another yard bites the dust!  My cording isn't perfect but whatever - it's for our travel trailer!

So far, I'm up to 15.375 yards sewn out of my stash (not including the cording yardage).  I'm hoping I can make it to 30 yards total by the end of the Summer Stashbush 2014 - which is September 21st.  I'm halfway there with a little over a month left.  I'd better get sewin!

Until next time - Happy Sewing!

Saturday, August 9, 2014

August MAGAM Challenge Done!

I finished my August MAGAM way ahead of schedule this month and I'm quite excited and can't wait to wear this outfit. The fabrics were purchased at the Sewing Guild's Annual Garage sale this past April and I have to say, these are two luscious fabrics that pair perfectly together.


My project was New Look 6762 - a raglan style t-shirt with an elastic waist skirt.  I've made both of these items before so I knew this would be a quick project.  

First, here's a close-up of both of the fabrics.  The top fabric is for the t-shirt.  It's some sort of crinkle knit - maybe acrylic or polyester, I'm not sure.  The bottom fabric for the skirt is a wonderful rayon that crinkled up a bit when I washed it.   It's like a match made in fabric heaven!

And, to top it off, I found the perfect necklace in my jewelry stash.  It's actually a pin just dangling on a chain, but it works!

The fabric for the skirt was a bit squirly and I knew there was no way I was going to be able to cut it out on the fold and still have my dots line up.  The front and back are cut from the same pattern piece so I decided to make a full pattern piece and cut out the pieces in a single layer instead.


After adding a few lines across the front of the pattern indicated by the arrows in the picture below, I was able to line-up my dots perfectly.  The lines were just placed randomly so that's why the spacing looks a bit uneven.

And here's the finished product!  

 My dots are perfectly lined up on the side seams.

And the skirt even twirls a little! 

So far as part of the Stashbust 2014, I've sewn up 14.125 yards.  I hate to think how many yards I have left to sew to completely empty my stash - or if that's even possible (I'm not quite sure that it is) but I'm going to give is a good try! 

Until next time - Happy Sewing!


Sunday, August 3, 2014

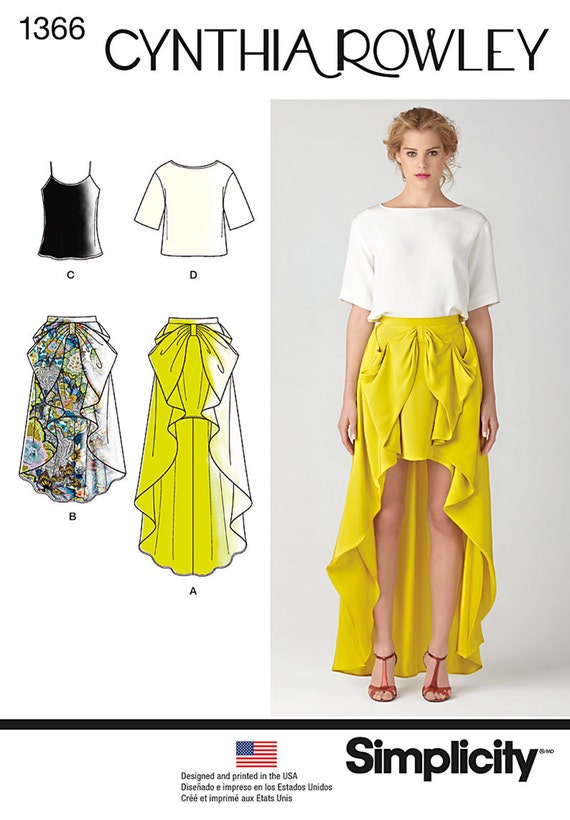
Simplicity 1366

I was very excited when I saw this skirt in the Simplicity catalog this summer.  Sure - it has alot of things going on at one time, but I was drawn to the interesting design.  And, I had the perfect fabric to experiment with - a wonderful turquoise lightweight linen from a "Brown Bag Challenge" from my local sewing group.  

Misses' Skirt in Two Lengths and Tops Simplicity Pattern 1366


What's a Brown Bag Challenge you ask?? Let me explain.  I've mentioned previously that our sewing guild chapter has an annual garage sale.  Of course at every garage sale, not everything is sold and the remaining fabric is distributed to various charities in the area.  A few of the "lovely" pieces (I say that sarcastically) are saved for our small group to do a challenge project with.  Each "lovely" piece is placed in a brown paper bag and everyone in the group gets a chance to select one - without peeking of course and we are given two months to sew something from whatever was in our bag.  We make a game of it by being able to steal someone else's fabric when your number comes up and of course I stole this one from another member of our group (sorry by the way!).  Our projects are due this month so I'm glad I finished in time.  I can't wait to see what everyone else comes up with - we have some very creative people in our group.  If you would like to see what I made last year for this challenge, please click here.

Anyways, back to this project.  The yellow skirt on the pattern envelope above was way, way to short in the front for me, so I modified the pattern by lengthening the front by 8 inches and shortening the back by 4 inches - tapering them both to meet at the sides.  After I got the challenge fabric home and pre-washed it, I noticed there was a stain in one area that would not come out so I had to work around it.  Plus, I did not have enough fabric to double the front flap pieces as the pattern suggests so instead, I just sewed them in a single layer with a small rolled hem on the top and bottom.  This seemed to work out just fine.  Here's the first attempt with the front flaps pinned in place.  Looks kinda ok from the front....


Yikes - but as I started to turn around - my derriere was looking huge!  (Notice the side seam points towards the back as well - I'm come back to this later)

OMG! Does this make my butt look big?!?!  I think so!!!  The pattern calls for a total of 6 pleats across the back which in my case, was not a good thing. I even tried pressing them flat and it didn't make a difference.

I mean really, who wants this much fabric back here??!?!  Maybe, just maybe if my fabric was a little more drapey it might work, but this linen was shouting loud and clear that there was way, way too much fabric.  So, out comes the seam ripper to remove that invisible zipper and rework the back.


I opted to make the back more fitted. I removed 6 inches from each center back piece (for a total of 12 inches) and added two fitting darts (one on each side).  Ahhh, this is looking much, much better.

The side seam still points towards the back, but maybe just a little more exaggerated now that the back is fitted.

And here's the finished product.  I really don't like this straight-on view, but it gives you a better idea of the draping on the front flap pieces.  The pattern suggests that you tack the flaps in just two places, but I didn't like the look of that and opted to tack it in 3 places.

Another view - you can see more of the draping here.

Another view.

Back view - The zipper really is straight - I think I'm just standing funny in this picture.

And a view without the sweater.  I need to make a white t-shirt to go with this so I can wear it to work.

Overall, I'm pretty happy with this skirt - it's a unique, one-of-a-kind design.  I'm sure the linen will wrinkle like crazy the first time I wear it too.

Until next time,

Happy Sewing!